The Allstar Web Transceiver is written in Java and requires that Java is loaded on your computer to
function. Since Java has been associated with many security issues the Java team has upped the
security level in recent releases (2015). Because of this the Web Transceiver will not function without
some additional security configuration in the Java control panel.
This following is configuration instructions for MS Windows, for Mac OSX please skip to page 11.
First make sure you have the latest Java. The download site is:
https://java.com/en/download/
Version 8 Update 131
Release date April 18, 2017
When loaded the site should look like this:
Select the download. In most cases the file will be saved and you must go to your download folder and click on the file. It will look something like this - jre-8u60-windows-x64.exe - but will differ
depending on the version and system you are running on. Make sure no other blocks are checked for
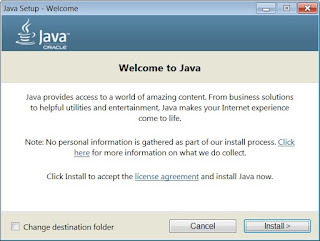
any extra add-on packages that installations often add in by default he install opening screen will look
like this:
Page 1 of 19 - How to configure Java for use with the Allstar Web Transceiver – 9/1/2015
Click on the INSTALL button. Java will install. If you have any old versions of Java on your system you will then see this screen:
Always delete old versions of Java from your system! Select uninstall.
In this case there was one old version and it was deleted.
At this point the latest Java is installed on your computer and you can select CLOSE.
But we are not done yet. Java's security settings need to be configured to accept the allstarlink.org web transceiver application. Select the Java Configuration window. On Windows 7 you would select the start icon, then all programs. Scroll down to Java and select it. Then move down to Configure Java and select that. Here is what it looks like in Windows 7. Other OS's will differ. You need to search for “Java configuration”
Click on Start Menu “Java configuration”
The configuration program will look like this. Select the SECURITY tab.
The security screen will look like this. If https://allstarlink.org does not appear in the list then select the Edit Site List tab.
Select Add and type – http s://allstarlink.org – into the provided block as shown above.
The exception should appear in the Exception Site List. Select OK and exit. This should complete the Java configuration.
Now browse to the allstarlink.org website.
If you already have an account at the allstarlink.org site enter your username and password in the appropriate blocks and select LOGIN. If not select the REGISTER HERE link in the lower left. Once you are registered you can come back with your username and password to login. Note you have to be a licensed radio amateur to use this site and the web transceiver!
Once you successfully login you will see this page. Click on the WebTransceiver icon at the top.
Then on the pull down select Launch Web Transceiver.
The Web Transceiver opening screen should look like this. Some nodes may differ. The transceiver only show online and web transceiver permitted nodes. Scroll down to view the node you want to connect to then click on the node number.
At this point you should click on the ACTIVATE JAVA icon in the square black window.
You will see a warning screen like this that. Check the “I accept risk...” block and select RUN
8 / 19
https://hamvoip.org/docs/WebTransceiverSetupHelp.pdf
Discussion Group - Any Amateur Radio VoIP discussion or Asterisk Allstar.
Subjects may include; Asterisk / Allstar / hamvoip platform
https://groups.io/g/Allstar


No comments:
Post a Comment
.
Allstar // AllstarLink -
https://groups.io/g/Allstar
.